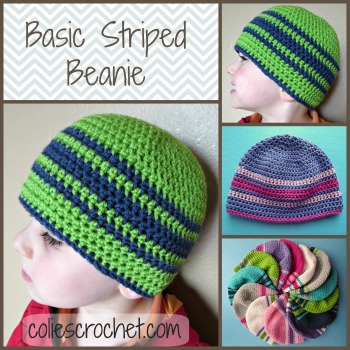
 The Basic Striped Beanie is a simple pattern that you can whip up in less than 2 hours. It is unisex in construction and is a great hat for newborns through adults. It can be highly personalized with the number of stripes and colors. I originally designed this pattern for charity beanies but found that I loved the pattern so much, I use it quite often for gifts as well.
Sizes:
- Newborn fits 14” head circumference
- Infant (3 months) fits 16” head circumference
- Baby (6 months) fits 18” head circumference
- Toddler (1–2 years) fits 19” head circumference
- Preschooler (3-5 years) fits 20” head circumference
- Child (6-10 years) fits 21” head circumference
- Teen/Small Adult fits 22” head circumference
- Medium Adult fits 23” head circumference
- Large Adult fits 24” head circumference
Skill Level:
Materials:
- I-5.5 mm hook; I use a Clover hook which I have found creates a slightly smaller gauge. I also tend to be a really tight crocheter. For these two reasons, I highly recommend working up a gauge swatch ahead of time. (See below in Pattern Notes for directions on working up a gauge swatch). You may need to go up or down one or two hook sizes
- Worsted Weight Yarn – I Love This Yarn by Hobby Lobby. Less than 100 grams or 175 yards total for hat. Amounts of each color depend on how many colors you are adding to your hat. Aran yarn would be an acceptable substitute if you don’t have access to worsted weight yarn.
- Yarn or Tapestry needle
Gauge:
- 15 hdc and 11.5 rows = 4” square; use a different size hook or yarn to obtain proper gauge (See below in Pattern Notes for directions on working up a gauge swatch)
Abbreviations and Stitches Used: (In US terminology)
- Ch – chain stitch
- Hdc – half double crochet
- MC – Magic Circle
- Rnd(s) – round(s)
- Sc – single crochet
- Sl st – Slip Stitch
- St – stitch
Pattern Notes:
- Pattern is written in US terms
- Read pattern in its entirety first
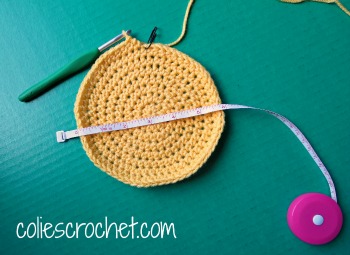
- Always work a gauge swatch first. Each crocheter crochets with a different tension. I tend to crochet really tight. To complete a gauge swatch, I crochet a 5”x5” square in the stitch or pattern specified. This is so that at least the first and last row and the sides will not be included in my 4”x4” square. I then measure how many stitches and rows are in my square. If it is too small (you have more stitches or rows than specified), then you move up a hook size or two. If it is too big (you have fewer stitches or rows than specified), then you move down a hook size or two. The goal is to reach a gauge that is as close as possible to the pattern writer’s. It may seem like a waste of time, but I always find that it is worth it in the end; especially with fitted, wearable items. If you are not within ¼” when I give the diameter measurement for the crown of the hat in each pattern size, you should check your gauge and work a gauge swatch if you haven’t already.
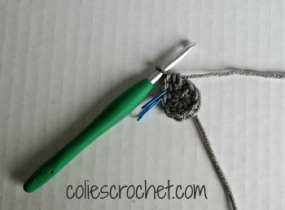
- When working in rounds, I always start with a magic circle; there are many great tutorials on the internet
- When working in rounds, the ch1 or ch2 NEVER count as the first stitch
For this tutorial, I will be working the Child size in 3 colors. All other sizes can be found below.
Child (6-10 years)
Rnd 1: With Color A, MC, ch1, work 8 hdc in circle. Join with sl st to 1st stitch. Pull tail tight. Ch 1. (7 total stitches)
Rnd 2: Work 2 hdc in each st around. Join with sl st to 1st stitch. Ch 1. (16)
Rnd 3: *Work 2 hdc in 1st st, work 1 hdc in next st;* repeat from * to * Join with sl st to 1st stitch. Ch 1. (24)
Rnd 4: *Work 2 hdc in 1st st, work 1 hdc in next 2 st;* repeat from * to * Join with sl st to 1st stitch. Ch 1. (32)
Rnd 5: *Work 2 hdc in 1st st, work 1 hdc in next 3 st;* repeat from * to * Join with sl st to 1st stitch. Ch 1. (40)
Rnd 6: *Work 2 hdc in 1st st, work 1 hdc in next 4 st;* repeat from * to * Join with sl st to 1st stitch. Ch 1. (48)
Rnd 7: *Work 2 hdc in 1st st, work 1 hdc in next 5 st;* repeat from * to * Join with sl st to 1st stitch. Ch 1. (56)
Rnd 8: *Work 2 hdc in 1st st, work 1 hdc in next 6 st;* repeat from * to * Join with sl st to 1st stitch. Ch 1. (64)
*Pause here and make sure the crown measures approximately 5.75“ in diameter.
Rnd 9: Work 2 hdc in 1st st, work 1 hdc in next 21 st; *work 2 hdc in next st, work 1 hdc in next 20 st;* repeat from * to * Join with sl st to 1st stitch. Ch 1. (67)
Rnd 10: Work 1 hdc into each st. Join with sl st to 1st stitch. Ch 1. (67)
Rnd 11: Work 1 hdc into each st. Switch to Color B. Join with sl st to 1st stitch. Ch 1.
Rnd 12: Work 1 hdc into each st. Switch to Color A. Join with sl st to 1st stitch. Ch 1.
Rnd 13: Work 1 hdc into each st. Switch to Color C. Join with sl st to 1st stitch. Ch 1.
Rnd 14: Work 1 hdc into each st. Join with sl st to 1st stitch. Ch 1.
Rnd 15: Work 1 hdc into each st. Switch to Color A. Join with sl st to 1st stitch. Ch 1.
Rnd 16: Work 1 hdc into each st. Switch to Color B. Join with sl st to 1st stitch. Ch 1.
Rnd 17: Work 1 hdc into each st. Switch to Color A. Join with sl st to 1st stitch. Ch 1.
Rnds 18 – 20: Work 1 hdc into each st. Switch to Color C. Join with sl st to 1st stitch. Ch 1.
*Pause here and make sure the length of the hat measures just short of 7“ from crown to bottom of hat when folded in half. If not, continue to add rows of Color A then switch to Color C.

Rnd 21: Work 1 sc in each st around hat. Join with sl st to 1st stitch. Finish off.
Finishing
Weave in all ends.

Newborn
Rnd 1: With Color A, MC, ch1, work 8 hdc in circle. Join with sl st to 1st stitch. Pull tail tight. Ch 1. (8 total stitches)
Rnd 2: Work 2 hdc in each st around. Join with sl st to 1st stitch. Ch 1. (16)
Rnd 3: *Work 2 hdc in 1st st, work 1 hdc in next st;* repeat from * to * Join with sl st to 1st stitch. Ch 1. (24)
Rnd 4: *Work 2 hdc in 1st st, work 1 hdc in next 2 st;* repeat from * to * Join with sl st to 1st stitch. Ch 1. (32)
Rnd 5: *Work 2 hdc in 1st st, work 1 hdc in next 3 st;* repeat from * to * Join with sl st to 1st stitch. Ch 1. (40) Switch to Color B.
*Pause here and make sure the crown measures approximately 3.75“ in diameter.
Rnd 6: Work 2 hdc in 1st st, work 1 hdc in each stitch around. Switch to Color A. Join with sl st to 1st stitch. Ch 1. (41)
Rnd 7: Work 1 hdc into each st Switch to Color C. Join with sl st to 1st stitch. Ch 1. (41)
Rnd 8: Work 1 hdc into each st. Join with sl st to 1st stitch. Ch 1.
Rnd 9: Work 1 hdc into each st. Switch to Color A. Join with sl st to 1st stitch. Ch 1.
Rnd 10: Work 1 hdc into each st. Switch to Color B. Join with sl st to 1st stitch. Ch 1.
Rnd 11: Work 1 hdc into each st. Switch to Color A. Join with sl st to 1st stitch. Ch 1.
Rnds 12 – 13: Work 1 hdc into each st. Switch to Color C. Join with sl st to 1st stitch. Ch 1.
*Pause here and make sure the length of the hat measures just short of 4.5“ from crown to bottom of hat when folded in half. If not, continue to add rows of Color A then switch to Color C.
Rnd 14: Work 1 sc in each st around hat. Join with sl st to 1st stitch. Finish off.
Infant (3 months)
Rnd 1: With Color A, MC, ch1, work 8 hdc in circle. Join with sl st to 1st stitch. Pull tail tight. Ch 1. (8 total stitches)
Rnd 2: Work 2 hdc in each st around. Join with sl st to 1st stitch. Ch 1. (16)
Rnd 3: *Work 2 hdc in 1st st, work 1 hdc in next st;* repeat from * to * Join with sl st to 1st stitch. Ch 1. (24)
Rnd 4: *Work 2 hdc in 1st st, work 1 hdc in next 2 st;* repeat from * to * Join with sl st to 1st stitch. Ch 1. (32)
Rnd 5: *Work 2 hdc in 1st st, work 1 hdc in next 3 st;* repeat from * to * Join with sl st to 1st stitch. Ch 1. (40)
Rnd 6: *Work 2 hdc in 1st st, work 1 hdc in next 4 st;* repeat from * to * Join with sl st to 1st stitch. Ch 1. (48)
*Pause here and make sure the crown measures between 4” and 4.25“ in diameter.
Rnd 7: Work 1 hdc into each st. Switch to Color B. Join with sl st to 1st stitch. Ch 1. (48)
Rnd 8: Work 1 hdc into each st. Switch to Color A. Join with sl st to 1st stitch. Ch 1.
Rnd 9: Work 1 hdc into each st. Switch to Color C. Join with sl st to 1st stitch. Ch 1.
Rnd 10: Work 1 hdc into each st. Join with sl st to 1st stitch. Ch 1.
Rnd 11: Work 1 hdc into each st. Switch to Color A. Join with sl st to 1st stitch. Ch 1.
Rnd 12: Work 1 hdc into each st. Switch to Color B. Join with sl st to 1st stitch. Ch 1.
Rnd 13: Work 1 hdc into each st. Switch to Color A. Join with sl st to 1st stitch. Ch 1.
Rnds 14 – 15: Work 1 hdc into each st. Switch to Color C. Join with sl st to 1st stitch. Ch 1.
*Pause here and make sure the length of the hat measures just short of 5“ from crown to bottom of hat when folded in half. If not, continue to add rows of Color A then switch to Color C.
Rnd 16: Work 1 sc in each st around hat. Join with sl st to 1st stitch. Finish off.
Baby (6 months)
Rnd 1: With Color A, MC, ch1, work 8 hdc in circle. Join with sl st to 1st stitch. Pull tail tight. Ch 1. (8 total stitches)
Rnd 2: Work 2 hdc in each st around. Join with sl st to 1st stitch. Ch 1. (16)
Rnd 3: *Work 2 hdc in 1st st, work 1 hdc in next st;* repeat from * to * Join with sl st to 1st stitch. Ch 1. (24)
Rnd 4: *Work 2 hdc in 1st st, work 1 hdc in next 2 st;* repeat from * to * Join with sl st to 1st stitch. Ch 1. (32)
Rnd 5: *Work 2 hdc in 1st st, work 1 hdc in next 3 st;* repeat from * to * Join with sl st to 1st stitch. Ch 1. (40)
Rnd 6: *Work 2 hdc in 1st st, work 1 hdc in next 4 st;* repeat from * to * Join with sl st to 1st stitch. Ch 1. (48)
Rnd 7: *Work 2 hdc in 1st st, work 1 hdc in next 5 st;* repeat from * to * Join with sl st to 1st stitch. Ch 1. (56)
*Pause here and make sure the crown measures approximately 4.75“ in diameter.
Rnd 8: Work 1 hdc into each st. Switch to Color B. Join with sl st to 1st stitch. Ch 1. (56)
Rnd 9: Work 1 hdc into each st. Switch to Color A. Join with sl st to 1st stitch. Ch 1.
Rnd 10: Work 1 hdc into each st. Switch to Color C. Join with sl st to 1st stitch. Ch 1.
Rnd 11: Work 1 hdc into each st. Join with sl st to 1st stitch. Ch 1.
Rnd 12: Work 1 hdc into each st. Switch to Color A. Join with sl st to 1st stitch. Ch 1.
Rnd 13: Work 1 hdc into each st. Switch to Color B. Join with sl st to 1st stitch. Ch 1.
Rnd 14: Work 1 hdc into each st. Switch to Color A. Join with sl st to 1st stitch. Ch 1.
Rnds 15 – 16: Work 1 hdc into each st. Switch to Color C. Join with sl st to 1st stitch. Ch 1.
*Pause here and make sure the length of the hat measures just short of 5.5“ from crown to bottom of hat when folded in half. If not, continue to add rows of Color A then switch to Color C.
Rnd 17: Work 1 sc in each st around hat. Join with sl st to 1st stitch. Finish off.
Toddler (1–2 years)
Rnd 1: With Color A, MC, ch1, work 8 hdc in circle. Join with sl st to 1st stitch. Pull tail tight. Ch 1. (8 total stitches)
Rnd 2: Work 2 hdc in each st around. Join with sl st to 1st stitch. Ch 1. (16)
Rnd 3: *Work 2 hdc in 1st st, work 1 hdc in next st;* repeat from * to * Join with sl st to 1st stitch. Ch 1. (24)
Rnd 4: *Work 2 hdc in 1st st, work 1 hdc in next 2 st;* repeat from * to * Join with sl st to 1st stitch. Ch 1. (32)
Rnd 5: *Work 2 hdc in 1st st, work 1 hdc in next 3 st;* repeat from * to * Join with sl st to 1st stitch. Ch 1. (40)
Rnd 6: *Work 2 hdc in 1st st, work 1 hdc in next 4 st;* repeat from * to * Join with sl st to 1st stitch. Ch 1. (48)
Rnd 7: *Work 2 hdc in 1st st, work 1 hdc in next 5 st;* repeat from * to * Join with sl st to 1st stitch. Ch 1. (56)
Rnd 8: *Work 2 hdc in 1st st, work 1 hdc in next 13 st;* repeat from * to * Join with sl st to 1st stitch. Ch 1. (60)
*Pause here and make sure the crown measures between 5” and 5.25“ in diameter.
Rnd 9: Work 1 hdc into each st. Switch to Color B. Join with sl st to 1st stitch. Ch 1. (60)
Rnd 10: Work 1 hdc into each st. Switch to Color A. Join with sl st to 1st stitch. Ch 1.
Rnd 11: Work 1 hdc into each st. Switch to Color C. Join with sl st to 1st stitch. Ch 1.
Rnd 12: Work 1 hdc into each st. Join with sl st to 1st stitch. Ch 1.
Rnd 13: Work 1 hdc into each st. Switch to Color A. Join with sl st to 1st stitch. Ch 1.
Rnd 14: Work 1 hdc into each st. Switch to Color B. Join with sl st to 1st stitch. Ch 1.
Rnd 15: Work 1 hdc into each st. Switch to Color A. Join with sl st to 1st stitch. Ch 1.
Rnds 16 – 18: Work 1 hdc into each st. Switch to Color C. Join with sl st to 1st stitch. Ch 1.
*Pause here and make sure the length of the hat measures just short of 6“ from crown to bottom of hat when folded in half. If not, continue to add rows of Color A then switch to Color C.
Rnd 19: Work 1 sc in each st around hat. Join with sl st to 1st stitch. Finish off.
Preschooler (3-5 years)
Rnd 1: With Color A, MC, ch1, work 7 hdc in circle. Join with sl st to 1st stitch. Pull tail tight. Ch 1. (7 total stitches)
Rnd 2: Work 2 hdc in each st around. Join with sl st to 1st stitch. Ch 1. (14)
Rnd 3: *Work 2 hdc in 1st st, work 1 hdc in next st;* repeat from * to * Join with sl st to 1st stitch. Ch 1. (21)
Rnd 4: *Work 2 hdc in 1st st, work 1 hdc in next 2 st;* repeat from * to * Join with sl st to 1st stitch. Ch 1. (28)
Rnd 5: *Work 2 hdc in 1st st, work 1 hdc in next 3 st;* repeat from * to * Join with sl st to 1st stitch. Ch 1. (35)
Rnd 6: *Work 2 hdc in 1st st, work 1 hdc in next 4 st;* repeat from * to * Join with sl st to 1st stitch. Ch 1. (42)
Rnd 7: *Work 2 hdc in 1st st, work 1 hdc in next 5 st;* repeat from * to * Join with sl st to 1st stitch. Ch 1. (49)
Rnd 8: *Work 2 hdc in 1st st, work 1 hdc in next 6 st;* repeat from * to * Join with sl st to 1st stitch. Ch 1. (56)
*Pause here and make sure the crown measures between 5.25” and 5.5“ in diameter.
Rnd 9: *Work 2 hdc in 1st st, work 1 hdc in next 7 st;* repeat from * to * Join with sl st to 1st stitch. Ch 1. (63)
Rnd 10: Work 1 hdc into each st. Switch to Color B. Join with sl st to 1st stitch. Ch 1. (63)
Rnd 11: Work 1 hdc into each st. Switch to Color A. Join with sl st to 1st stitch. Ch 1.
Rnd 12: Work 1 hdc into each st. Switch to Color C. Join with sl st to 1st stitch. Ch 1.
Rnd 13: Work 1 hdc into each st. Join with sl st to 1st stitch. Ch 1.
Rnd 14: Work 1 hdc into each st. Switch to Color A. Join with sl st to 1st stitch. Ch 1.
Rnd 15: Work 1 hdc into each st. Switch to Color B. Join with sl st to 1st stitch. Ch 1.
Rnd 16: Work 1 hdc into each st. Switch to Color A. Join with sl st to 1st stitch. Ch 1.
Rnds 17 – 19: Work 1 hdc into each st. Switch to Color C. Join with sl st to 1st stitch. Ch 1.
*Pause here and make sure the length of the hat measures just short of 6.5“ from crown to bottom of hat when folded in half. If not, continue to add rows of Color A then switch to Color C.
Rnd 20: Work 1 sc in each st around hat. Join with sl st to 1st stitch. Finish off.
Teen/Small Adult
Rnd 1: With Color A, MC, ch1, work 7 hdc in circle. Join with sl st to 1st stitch. Pull tail tight. Ch 1. (7 total stitches)
Rnd 2: Work 2 hdc in each st around. Join with sl st to 1st stitch. Ch 1. (14)
Rnd 3: *Work 2 hdc in 1st st, work 1 hdc in next st;* repeat from * to * Join with sl st to 1st stitch. Ch 1. (21)
Rnd 4: *Work 2 hdc in 1st st, work 1 hdc in next 2 st;* repeat from * to * Join with sl st to 1st stitch. Ch 1. (28)
Rnd 5: *Work 2 hdc in 1st st, work 1 hdc in next 3 st;* repeat from * to * Join with sl st to 1st stitch. Ch 1. (35)
Rnd 6: *Work 2 hdc in 1st st, work 1 hdc in next 4 st;* repeat from * to * Join with sl st to 1st stitch. Ch 1. (42)
Rnd 7: *Work 2 hdc in 1st st, work 1 hdc in next 5 st;* repeat from * to * Join with sl st to 1st stitch. Ch 1. (49)
Rnd 8: *Work 2 hdc in 1st st, work 1 hdc in next 6 st;* repeat from * to * Join with sl st to 1st stitch. Ch 1. (56)
Rnd 9: *Work 2 hdc in 1st st, work 1 hdc in next 7 st;* repeat from * to * Join with sl st to 1st stitch. Ch 1. (63)
*Pause here and make sure the crown measures approximately 6“ in diameter.
Rnd 10: Work 2 hdc in 1st st, work 1 hdc in next 7 st; *work 2 hdc in next st, work 1 hdc in next 6 st;* repeat from * to * Join with sl st to 1st stitch. Ch 1. (71)
Rnd 11: Work 1 hdc into each st. Join with sl st to 1st stitch. Ch 1. (71)
Rnd 12: Work 1 hdc into each st. Switch to Color B. Join with sl st to 1st stitch. Ch 1.
Rnd 13: Work 1 hdc into each st. Switch to Color A. Join with sl st to 1st stitch. Ch 1.
Rnd 14: Work 1 hdc into each st. Switch to Color C. Join with sl st to 1st stitch. Ch 1.
Rnd 15: Work 1 hdc into each st. Join with sl st to 1st stitch. Ch 1.
Rnd 16: Work 1 hdc into each st. Switch to Color A. Join with sl st to 1st stitch. Ch 1.
Rnd 17: Work 1 hdc into each st. Switch to Color B. Join with sl st to 1st stitch. Ch 1.
Rnd 18: Work 1 hdc into each st. Switch to Color A. Join with sl st to 1st stitch. Ch 1.
Rnds 19 – 22: Work 1 hdc into each st. Switch to Color C. Join with sl st to 1st stitch. Ch 1.
*Pause here and make sure the length of the hat measures just short of 7.5“ from crown to bottom of hat when folded in half. If not, continue to add rows of Color A then switch to Color C.
Rnd 23: Work 1 sc in each st around hat. Join with sl st to 1st stitch. Finish off.
Medium Adult
Rnd 1: With Color A, MC, ch1, work 8 hdc in circle. Join with sl st to 1st stitch. Pull tail tight. Ch 1. (7 total stitches)
Rnd 2: Work 2 hdc in each st around. Join with sl st to 1st stitch. Ch 1. (16)
Rnd 3: *Work 2 hdc in 1st st, work 1 hdc in next st;* repeat from * to * Join with sl st to 1st stitch. Ch 1. (24)
Rnd 4: *Work 2 hdc in 1st st, work 1 hdc in next 2 st;* repeat from * to * Join with sl st to 1st stitch. Ch 1. (32)
Rnd 5: *Work 2 hdc in 1st st, work 1 hdc in next 3 st;* repeat from * to * Join with sl st to 1st stitch. Ch 1. (40)
Rnd 6: *Work 2 hdc in 1st st, work 1 hdc in next 4 st;* repeat from * to * Join with sl st to 1st stitch. Ch 1. (48)
Rnd 7: *Work 2 hdc in 1st st, work 1 hdc in next 5 st;* repeat from * to * Join with sl st to 1st stitch. Ch 1. (56)
Rnd 8: *Work 2 hdc in 1st st, work 1 hdc in next 6 st;* repeat from * to * Join with sl st to 1st stitch. Ch 1. (64)
Rnd 9: *Work 2 hdc in 1st st, work 1 hdc in next 7 st;* repeat from * to * Join with sl st to 1st stitch. Ch 1. (72)
*Pause here and make sure the crown measures between 6.25” and 6.5“ in diameter.
Rnd 10: *Work 2 hdc in 1st st, work 1 hdc in next 23 st;* repeat from * to * Join with sl st to 1st stitch. Ch 1. (75)
Rnds 11 – 13: Work 1 hdc into each st. Switch to Color B. Join with sl st to 1st stitch. Ch 1. (75)
Rnd 14: Work 1 hdc into each st. Switch to Color A. Join with sl st to 1st stitch. Ch 1.
Rnd 15: Work 1 hdc into each st. Switch to Color C. Join with sl st to 1st stitch. Ch 1.
Rnd 16: Work 1 hdc into each st. Join with sl st to 1st stitch. Ch 1.
Rnd 17: Work 1 hdc into each st. Switch to Color A. Join with sl st to 1st stitch. Ch 1.
Rnd 18: Work 1 hdc into each st. Switch to Color B. Join with sl st to 1st stitch. Ch 1.
Rnd 19: Work 1 hdc into each st. Switch to Color A. Join with sl st to 1st stitch. Ch 1.
Rnds 20 – 24: Work 1 hdc into each st. Switch to Color C. Join with sl st to 1st stitch. Ch 1.
*Pause here and make sure the length of the hat measures just short of 8.5“ from crown to bottom of hat when folded in half. If not, continue to add rows of Color A then switch to Color C.
Rnd 25: Work 1 sc in each st around hat. Join with sl st to 1st stitch. Finish off.
Large Adult
Rnd 1: With Color A, MC, ch1, work 7 hdc in circle. Join with sl st to 1st stitch. Pull tail tight. Ch 1. (7 total stitches)
Rnd 2: Work 2 hdc in each st around. Join with sl st to 1st stitch. Ch 1. (14)
Rnd 3: *Work 2 hdc in 1st st, work 1 hdc in next st;* repeat from * to * Join with sl st to 1st stitch. Ch 1. (21)
Rnd 4: *Work 2 hdc in 1st st, work 1 hdc in next 2 st;* repeat from * to * Join with sl st to 1st stitch. Ch 1. (28)
Rnd 5: *Work 2 hdc in 1st st, work 1 hdc in next 3 st;* repeat from * to * Join with sl st to 1st stitch. Ch 1. (35)
Rnd 6: *Work 2 hdc in 1st st, work 1 hdc in next 4 st;* repeat from * to * Join with sl st to 1st stitch. Ch 1. (42)
Rnd 7: *Work 2 hdc in 1st st, work 1 hdc in next 5 st;* repeat from * to * Join with sl st to 1st stitch. Ch 1. (49)
Rnd 8: *Work 2 hdc in 1st st, work 1 hdc in next 6 st;* repeat from * to * Join with sl st to 1st stitch. Ch 1. (56)
Rnd 9: *Work 2 hdc in 1st st, work 1 hdc in next 7 st;* repeat from * to * Join with sl st to 1st stitch. Ch 1. (63)
Rnd 10: *Work 2 hdc in 1st st, work 1 hdc in next 8 st;* repeat from * to * Join with sl st to 1st stitch. Ch 1. (70)
*Pause here and make sure the crown measures between 6.5” and 6.75“ in diameter.
Rnd 11: *Work 2 hdc in 1st st, work 1 hdc in next 7 st; (work 2 hdc in next st, work 1 hdc in next 8 st) 3 times)* repeat from * to * 1 more time. Join with sl st to 1st stitch. Ch 1. (78)
Rnds 12 – 16: Work 1 hdc into each st. Switch to Color B. Join with sl st to 1st stitch. Ch 1. (78)
Rnd 17: Work 1 hdc into each st. Switch to Color A. Join with sl st to 1st stitch. Ch 1.
Rnd 18: Work 1 hdc into each st. Switch to Color C. Join with sl st to 1st stitch. Ch 1.
Rnd 19: Work 1 hdc into each st. Join with sl st to 1st stitch. Ch 1.
Rnd 20: Work 1 hdc into each st. Switch to Color A. Join with sl st to 1st stitch. Ch 1.
Rnd 21: Work 1 hdc into each st. Switch to Color B. Join with sl st to 1st stitch. Ch 1.
Rnd 22: Work 1 hdc into each st. Switch to Color A. Join with sl st to 1st stitch. Ch 1.
Rnds 23 – 27: Work 1 hdc into each st. Switch to Color C. Join with sl st to 1st stitch. Ch 1.
*Pause here and make sure the length of the hat measures just short of 9.5“ from crown to bottom of hat when folded in half. If not, continue to add rows of Color A then switch to Color C.
Rnd 28: Work 1 sc in each st around hat. Join with sl st to 1st stitch. Finish off.
Hit Print below or click here to download a pdf
Enjoy and please share your finished projects on any of my social media.

Copyright 2014 Colie’s Crochet. All rights reserved. You may use this pattern for personal use, gifts or charity items. Sales of finished items are permitted but designer requests that you link back to pattern and credit Colie’s Crochet with the original design. No part of this document may be reproduced or transmitted in any form including but not limited to electronic, mechanical, photocopying, or otherwise without prior written consent from the designer.
Be sure to follow Colie’s Crochet for updates and to see what I’m currently working on and to share pictures of your finished pieces from Colie’s Crochet patterns.


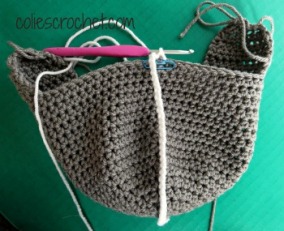
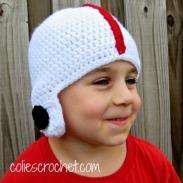
 This is the last football pattern in my football series. The Football Beanie can be made in traditional colors of brown and white or make it in your favorite team’s colors. You can add even more color by making the stripes and laces different colors. I love this hat for those who love football but want to represent their team without wearing head-to-toe team gear. It is a simple beanie that is fast to work up and a warm hat to wear. You can also add earflaps and braids to turn it into a fun earflap hat.


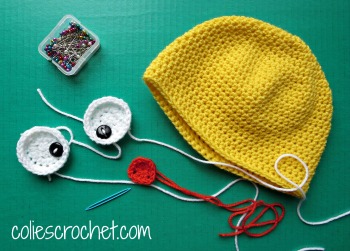
 I have been loving all of the handmade spring items I’ve been seeing lately. The flowers, animals, and bright spring colors are really getting me in the mood for Spring (even though it just snowed here this morning). Even my tulips and lilies are starting to sprout but we just don’t seem to want to get rid of winter around here yet. Make a simple Spring Peeper Beanie to help fill all of your Easter baskets this year! For this blog post, I did a traditional yellow chick. My children picked all of the colors for the other hats which we will be donating.


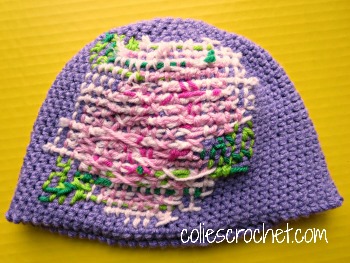
 The Cross-stitch Rose Beanie is a simple beanie-style or cloche hat in construction but add in the art of cross-stitch and it really puts it over the top. The hat features a rose that you crochet and then cross-stitch the rose design on afterwards. It is worked in sc to form the grid for the cross-stitch design. Inspired by Valentine’s Day, I created this hat for my 2-year-old daughter after seeing it in many items (mostly stool covers) that incorporated either a print or a true cross-stitch design.
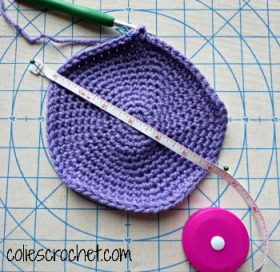 Rnd 14: Work 2sc in 1st st, work 1sc in next 32 st, work 2sc in next st, work 1sc in next 31 st (67)
 Work sl st into next 2 st to finish off the spiral.
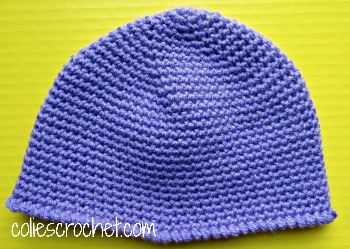
 your hat, do the following:

 Or you can download a pdf copy
